Below is a letter that I sent with photos to an established business that resides in downtown St Paul. The curator of the gardens wanted to introduce native materials to the gardens for all visitors to view and understand that it can be very easy to add native L. michiganense to your own garden collections.
Since then, I have dispersed seeds to anyone that asks as well as donate to Pacific Bulb Society, Royal Horticultural Lily Society, North American Lily Society and have to date passed out over 10 thousand seeds of Lilium michiganense.
Dear ( keeping name private ) ,
Here is the scoop
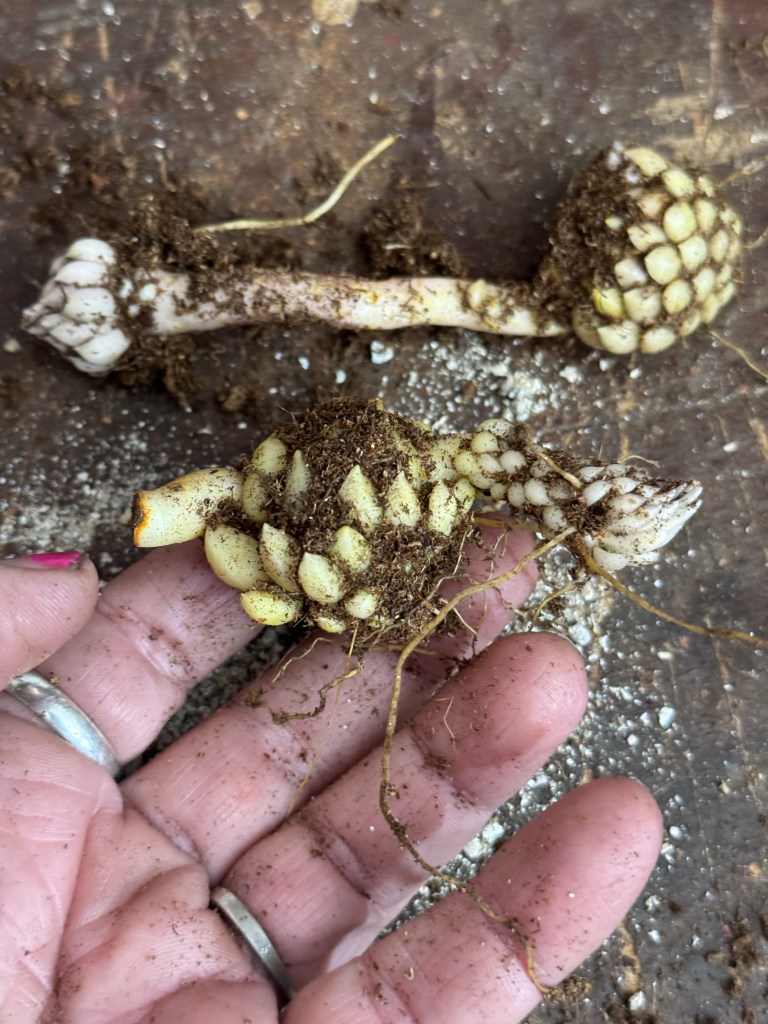
Characteristically labeled as a ‘dogbone’ in shape, these are photos of the ones that I am sending out that have grown from seed started in 2022. These bloomed for the first time in 2025.

I cannot wait to see these lilies in Downtown St Paul, I will watch them grow tall and strong. Thank you for your interest in Native Species Lilium michiganense. I have 9 stolens that hGg has to spare this season. Wish there was more that were of size.
The main thing to remember is that they don’t truly want to be sitting in a saturated, non draining wet environment. You mentioned a drip line from ground sprinkler systems, and I truly believe that the space that your planting will work out great. I have enclosed some larger stolen to plant. Lay them sideways., like they are in my hand in the above image.
This perennial plant is 1½–4′ tall, (yet mine have reached 5 feet tall with grand candelabra inflorescence.) The central stem is light to medium green. The leaves usually occur in whorls of 3-7 along the stem, although some of the upper leaves may occur in pairs or they may alternate individually. Individual leaves are 2½–5″ long and ¼–¾” across; they are elliptic in shape with round, oval and smooth (entire) along their margins, and sessile where it is attached directly without peduncles, or nearly so. Leaf venation is parallel. Each showy flower is about 2-3″ long and similarly across, consisting of 6 tepals, 6 stamens, and a pistil with a single style. The tepals are yellow-orange to orange-red, purple-spotted, lanceolate in shape, and strongly recurved; the tips of the tepals are located near the base of the flower. The stamens are strongly exserted and slightly spreading; their filaments are light green to nearly the color of a winter white, while their anthers are reddish brown paprika in color, oblongoid or ellipsoid in shape, and less than ½” in length. The style is strongly exserted and curved slightly upward; it is light yellow to nearly a winter beige white, except toward the slightly swollen tip, where it is tinted yellow to orange-red. I KNOW THIS IS A LOT BUT THOUGHT I WOULD ADD ALL OF THIS AS THE STRUCTURE IS UNMISTAKABLE.
The blooming period occurs from early to mid-summer, lasting about 1 month. There is no noticeable floral scent but the pollinators certainly seem to appreciate the orientation of the bloom. Afterwards, the flowers are replaced by seedpods. ( I collect seeds and will put them into the freezer for ventilation for a few months before I pot them up for germination ) Seeds are provide, I sent out two packages and there is about 50 in each package…. So toss in your freezer, within a few months, take them out and start the process for delayed hypogeal germination option 1.
There are other options to get to the same results. you can skip this whole process and scroll down to option 2 or 3—
Delayed hypogeal germination. will sprout their first true leaf only after a 3 month cold period. So, Frozen for three months and then warm for three months and then potted up one will see a true leaf will be put up within a three week period from the time the bulblet is planted out in a container . It is well worth watching these seeds on a regular basis as some may germinate as immediate hypogeal. The species with this type of germination which I have grown will germinate as follows: 40 to 60 days after planted
LETS PLANT SEEDS—- The main key is patience !!!! Lets look at the seeds
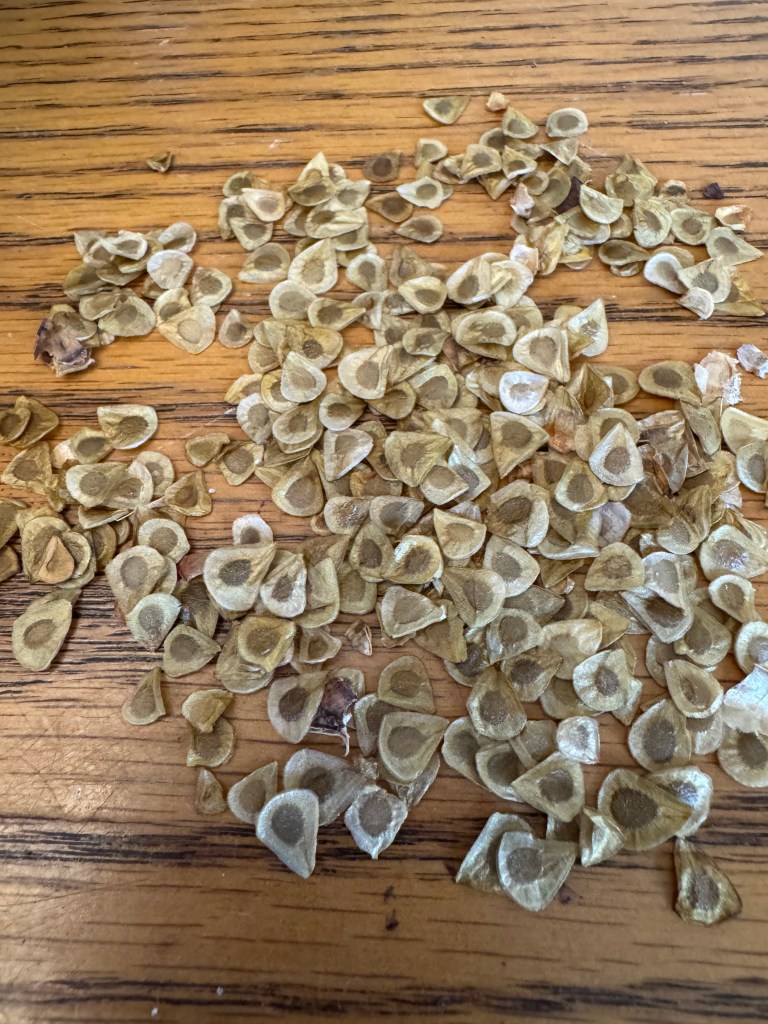
1 – Zip-lock baggie germination. This is what I am doing now. Sep-Dec Freeze Seeds
Jan-March –Prepare your zip-lock baggies with peat and a light spray of water, just damp, not wet or saturated. Now, place baggie in a dark area that is around 18 °C. (65 °F.). I have mine in a dark space above my refrigerator mimicking a summer warm season, and I know that it is warmer than the above temps, where it is warm and completely dark… I will check them from time to time, open the baggie up and give them an air exchange, Check to see if there is mold and remove anything that looks fuzzy or just not right. Better to toss now then to infect an entire yield of potential crops. but for the most part just forget about them till after the NEW YEARS…
APRIL-July Artificial Winter Give your seeds a cold environment (as long as the seeds have germinated), give the bulblets now at least a three month, or longer, cold (dormant) period at temperatures of 2 °C. (35 °F.). I use the four month incubation time period as the resulting seedlings do far better than those given a three month incubation period. We will not see leaves yet until they are planted in the pots during the next Artificial Climate.
Late August Artificial Summer When you remove them from the refrigerator, you will see baby bulbs in the baggie, — Pot them up by inverting the entire mass of peat and seeds ( I usually cut the baggie and remove the entire (peat and seed pancake) and place gently to not disrupt the roots of the babies into a plastic recycle container that has a lid and holes punched in. Use nice compost or potting soil, sand mix that is halfway full, then place your seed mass in the pot, and then add more amended soil … water in well with warm water and wait to sprout.. They will be green leaves that will emerge in a few weeks, allow them to grow as well as allowing them to go dormant in October.. You need to keep an eye on them if you place them outside and remember, you may only see visible one single leaf for its first growing season. These bulbs will be a bit bigger in the soil if you are using a small pot that is clear to watch root growth.
OCT-JAN — Artificial Winter — Cover your dormant Species seeds and place in fridge. I will give it a drink of water first and then allow it to drain pretty good for a couple days before I place in the fridge.
FEB-MAY Artificial Summer Pull out and start watering, Remember that the species likes the damper soils that drain well. At this point, I will plant the entire pot into the grounds once the season is safe for planting in one clump and allow them to grow together and crowd each other, they do well this way and will go dormant naturally. Sometimes the dormancy seems soon after they are planted… It is ok… This species as many, wanders naturally unground and will use contractile roots by pulling itself to where they want to be. Deeper they may want or sometimes I have seen them a foot away from the marker where I originally planted.
Congratulations. You are now a Delayed Hypogeal Germinator. If you would like to try the other methods with your seeds, here are two methods that will possibly reach the same outcome.
2 – Direct planting or broadcasting If you do not want to fuss, broadcast seeds— lightly cover and let nature take care of the vernalization, stratification and germination for you right now Sept- October— You will lose seed as some may feed wildlife as well as some just will not survive our winter conditions— Allow nature to take care of what she does best… Remember, in spring and summer, you will not see anything as the bulbs are developing underground first. Make sure that if your direct planting, place a plant marker so that you do not mistake the new growth that will follow in year two as a weed.
3 – Or— when you get your seeds, just toss them into the deep freezer and then plant your lily seeds about 1/4 inch deep. (June or July) the following year, Throughout the summer keep the soil moist. It’s like the seeds are in the baggie in a warm dark space in your home. What is happening underground is that there is bulb development. The following spring your bulblets will send up their first true leaves. First winter’s survival rate after the first sprouting will vary from one species to the next. My observations are that L. michiganense have had poor first winter survival rates if they are not protected with blankets of leaves. So if you’re not sure about your winter conditions and have a limited supply of seeds it is best to plant using the baggie method. That way you can ensure your seedlings have a little more maturity before they have to face their first out door winter. But with added leaf litter blankets for the first winter they do pretty good.
So in a nut shell
1. Put into a warm environment for 3-4 months, zip lock baggies work great -followed by a refrigerator verbalization for another 3-4 months and pot up or plant in the grounds This method speeds up the maturity by mimicking a season inside your home. Bloom time will happen in 3 years.
2.. Plant now Fall and allow nature to do what she does, Stratification, Vernalization and Germination. the process of elimination of weak or deformed seed embryos and the strongest survive…. Some seeds do not make it over the cold winter and if you planted 30 seeds, only 20 may germinate underground in the spring ( remember you will not see anything yet in the spring as the bulbs are forming underground if they survived the first winter ) Bloom time will happen in 5 seasons
3. Toss in freezer and deal with them in June, you would plant them and the warm earth and spring rain will nourish the newly formed underground bulbs ( small and tiny ) the size of a grain of rice. You will not see any growth emerging until the following spring. This will mimic the first warm season naturally instead of putting them above the refrigerator. Bloom time is reduced by a year and will flower in 3-4 seasons.
This is the three different processes that I use, as I am in a hurry to get the word out to grow Minnesota Native Lilies Species Project. Hoping for your success —-
Do not hesitate to call or email. I will drop off your lilies at the Hotel on Monday—— Please take care All my thoughts and blessings for all you do. Thank you for allowing me this opportunity.
Xoxo Rosie Here is the link where you will see a few of my photos https://minnesotamartagonlilies.com/l-michiganense-species/
.
All three methods work—— Sometimes life has us busy where fortunately we still have a choice on getting to the same outcome.
The preference is full to partial sun, loamy soil or sandy loam, and moist conditions. An established plant, however, can withstand some drought. Cultivation from seed is slow and difficult, while cultivation from bulbs or transplants is somewhat faster and easier. Plants that are spoiled with too much fertilizer and standing in too much watering may flop over.
The native Michigan Lily occurs in scattered counties of Illinois (see Distribution Map), where it is uncommon. Habitats include moist black soil prairies, openings in deciduous woodlands, typical thickets and sandy thickets, Bur Oak savannas, moist sandy meadows along rivers, swamps, fens, and prairie remnants along railroads. Michigan Lily is found in higher quality natural areas.
| J | F | M | A | M | J | J | A | S | O | N | D | J | F | M | A | M | J | J | A | S | O | N | D | |
| F | F | F | F | |||||||||||||||||||||
| AS | AS | AS | ||||||||||||||||||||||
| AW | AW | AW | AW | |||||||||||||||||||||
| AS | AS | AS | ||||||||||||||||||||||
| AW | AW | AW | AW | |||||||||||||||||||||
| AS | AS | AS | P | P | P |
Key as follows for my routine. Please note that my Artificial Winter calendar is always prolonged by a month 16 weeks, whereas my Artificial Summer is 12 weeks. — I do that as my climate has a longer winter season . I have documented my findings, noting that I have a greater percentage of casualties when I decrease my Artificial Winter Season.
Please remember, that your calendar may look different, if you take your frozen seeds out in June.
| F= Freeze Clean and Collected Seed | AS = Artificial Summer ( warm season ) |
| P= Plant out in garden and place a marker, only as deep as container to go flush to ground level. | AW= Artificial Winter ( cold season ) fridge with cover on |
